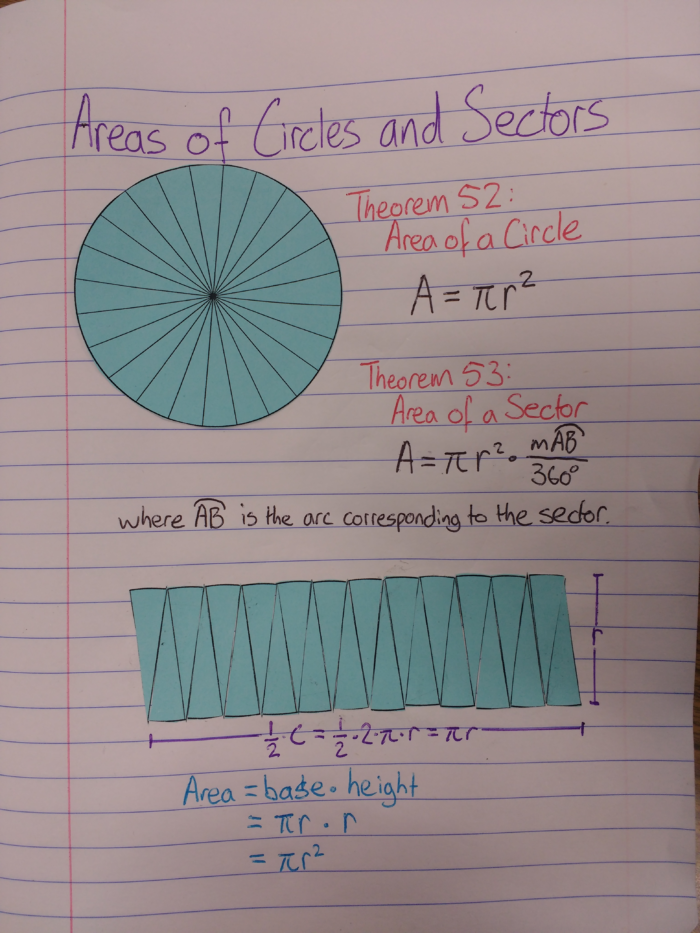
Whether it’s polygons in geometry, or under a curve in calculus, I have a favorite way to explore area in class: cut up shapes made of paper and glue them back together in a new way. This time, I’m applying the idea to visually prove the formula for the area of a circle.
If it isn’t clear, the parallelogram-ish shape was originally the same as the circle at the top of the page, but its sectors have been cut apart and glued into the alternating up-and-down pattern that’s shown.
I printed eight circles to a page, and cut them into four sections so that each student could have two of them. There have been past years where I’ve had students draw and cut out their own circles to do this activity, which has the nice side effect of showing that students with different sized circles still get the same result. However, I decided this year that it was more important to get students into the activity quickly, so I gave them the template to use. Also, the sized circles I used (the radius is 1.35 in) seem ideal for fitting in a composition notebook.
You can download files for the circles here.
A few pointers on how to approach this lesson:
- I wrote clear instructions on my board to only cut apart one circle. If you don’t emphasize this, you’re likely to have a kid who has to glue an extra circle back together unnecessarily.
- Encourage students to get on with the task quickly. I find that while cutting and pasting shouldn’t take very long, students can drag things out if given the opportunity, and sometimes feel like they’re doing work even if the pair of scissors in their hand. Even the students who showed up five minutes early were told to get going the moment they entered the room, which set the tone for the following students.
- Also encourage students to be precise with their gluing. Some of my kids had strange looking shapes that either curved down the page, or had large gaps between each sector and couldn’t fit the whole thing on their page.
- Students will finish the gluing part of of their notes at very different times. I was prepared by having the notes finished in my notebook, so students could copy them as they needed. I also allowed them to take a picture of the notes on their phone to copy from, so they wouldn’t have to wait for another student to finish. Also, because students were finishing at different times, I had other work for students to go on with when they were done with the notes too.
- I waited until most students had finished gluing before we discussed the meaning of the activity. I tried to prompt the students themselves to recognize what’s going on here so they could explain their understanding to the rest of the class; this worked to varying degrees in my different classes.
These notes include the formula for the area of a sector, but our justification of it is not included on this page. This post from a few years ago outlines how I like to introduce that concept.
